While specialized motorcycle stands are commonly used to support the bike during wheel removal, not everyone has access to such equipment. However, it is still possible to remove the front motorcycle wheel safely and effectively without a stand by following a few simple steps. In this guide, we will walk you through the process of removing the front wheel of a motorcycle without the use of a stand, ensuring you can carry out this task with confidence and ease.
How to Remove Front Motorcycle Wheel Without a Stand?
Let us check the various ways on how to remove front motorcycle wheel without a stand!
01. Front Wheel Off the Ground
Utilize a sturdy and reliable substitute: Find a substitute item that can safely support the weight of your motorcycle’s front end. This could be a stack of sturdy wooden blocks, a stable platform, or even a set of bricks. Ensure that the substitute you choose can bear the weight of your motorcycle and provide a stable base.
Seek assistance from a friend: If you have a trusted friend or fellow rider available, ask them to help you by holding the motorcycle steady while you work on removing the wheel. Make sure your friend is strong enough to support the weight of the bike and understands the importance of maintaining balance and stability.
Use a motorcycle jack or lift: If you have access to a motorcycle jack or lift, you can employ this equipment to raise the front end of your bike safely. Ensure that the jack or lift is stable, properly positioned, and securely holding the motorcycle before proceeding with wheel removal.
Whichever method you choose, it’s essential to prioritize safety and stability throughout the process. The goal is to raise the front wheel off the ground, allowing you to proceed with removing it without compromising balance or risking damage to yourself or the motorcycle.
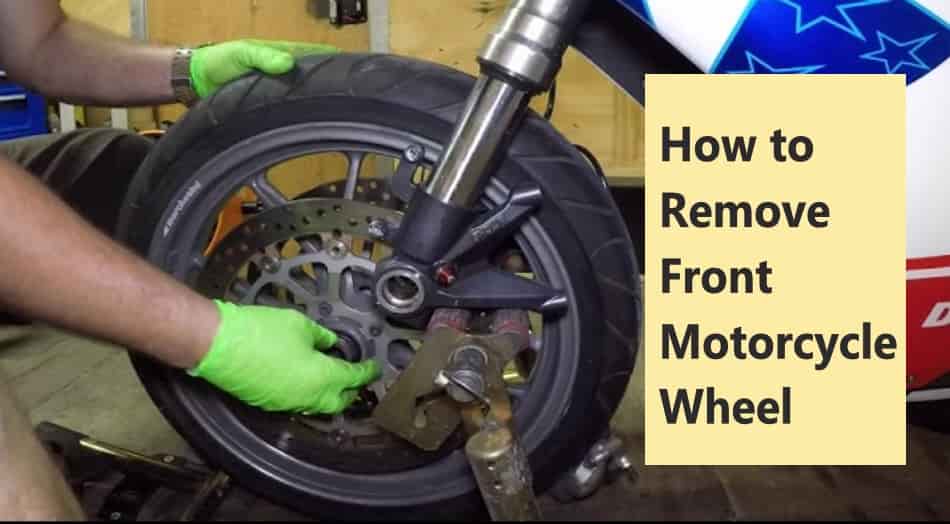
02. Unbolt the Brake Caliper
Locate the brake caliper: The brake caliper is usually positioned on the front fork, near the rotor. It is responsible for clamping the brake pads onto the rotor to create friction and slow down or stop the motorcycle.
Inspect the caliper mounting bolts: Identify the bolts that secure the brake caliper to the front fork. There are typically two bolts holding the caliper in place. They may be located on the front or backside of the caliper. Some motorcycles may have a retaining pin or clip instead of bolts, so familiarize yourself with the specific design of your motorcycle’s caliper.
Gather the necessary tools: To remove the caliper mounting bolts, you’ll need the appropriate tools. Typically, a socket wrench or Allen wrench (hex key) will be required, depending on the type of bolts used.
Loosen and remove the caliper mounting bolts: Use the appropriate tool to loosen and remove the caliper mounting bolts. Turn the bolts counterclockwise to loosen them. Once they are loose, you can usually remove them by hand.
Carefully move the caliper aside: After removing the mounting bolts, gently move the caliper aside, being cautious not to damage the brake line. This step allows for enough clearance to remove the wheel.
Remember to handle the brake caliper with care to avoid any accidental damage or stress on the brake lines. It’s also a good practice to secure the caliper in a way that prevents it from dangling or putting strain on the brake line during the wheel removal process.
03. Remove the Axle
Locate the axle: The axle is a long metal rod that passes through the center of the front wheel hub. It connects the two fork legs and holds the wheel securely.
Determine the type of axle: Different motorcycles may have different types of axles, such as a standard axle with axle nuts or a quick-release axle. Identify the type of axle your motorcycle uses, as the removal process may vary.
Gather the necessary tools: Depending on the type of axle, you will need the appropriate tools. For a standard axle with axle nuts, you’ll typically need a wrench or socket wrench that fits the axle nut size. If your motorcycle has a quick-release axle, it may require a specialized tool or a quick-release lever.
Loosen and remove the axle: If your motorcycle has a standard axle, use the appropriate tool to loosen and remove the axle nut on one side of the wheel. Turn the nut counterclockwise to loosen it. Once it’s loose, continue turning it until you can remove it by hand. Repeat this process for the other side of the axle if applicable.
Slide out the axle: With the axle nuts removed, carefully slide the axle out from one side of the wheel. Hold onto the wheel with one hand while gently pulling the axle out from the other side. Pay attention to any spacers or washers that may be present on either side of the wheel. Keep these components in order to ensure correct reassembly later.
Set aside the axle and related components: Place the axle, nuts, spacers, and washers in a safe location where they won’t get lost or damaged. It’s a good practice to keep them together for easier reassembly.
With the axle removed, you can now proceed to the next step, which involves safely removing the front wheel from the motorcycle.
04. Remove the Front Wheel
Support the motorcycle securely: Ensure that the motorcycle is stable and properly supported. If you followed Step 1 and elevated the front wheel off the ground using a substitute or a motorcycle jack/lift, make sure it remains in a secure position.
Gently pull the front wheel forward: Grasp the front wheel firmly with both hands, placing one hand on each side. Gently pull the wheel forward, away from the fork legs. If the wheel feels stuck, you may need to wiggle it slightly while applying steady pressure.
Remove the wheel from the fork legs: Once the wheel is free from the fork legs, carefully guide it out from between them. Take note of any spacers or washers that may be present on either side of the wheel, as they will need to be reinstalled correctly during reassembly.
Set the wheel aside in a safe location: Place the removed front wheel on a clean and secure surface, making sure it won’t roll away or get damaged. It’s recommended to lay it flat or place it upright against a stable object.
During the removal process, be mindful of the weight of the front wheel and handle it with care to prevent any injuries or damage. With the front wheel successfully removed, you can now proceed with any necessary maintenance or repairs, such as changing the tire or inspecting the brake components.
Final Verdict
Removing the front wheel of a motorcycle without a stand is a task that can be accomplished with careful execution and attention to safety. By following the steps outlined in this guide, you can successfully remove the front wheel of your motorcycle even without a specialized stand. Remember to prioritize stability throughout the process by using a sturdy substitute or seeking assistance from a friend to support the front end of the bike.
Unbolting the brake caliper, removing the axle, and safely taking off the front wheel will allow you to perform maintenance or repairs with confidence. As always, exercise caution and ensure that you have the necessary tools and knowledge to reassemble the components correctly. If you’re uncertain about any aspect of the process or lack experience, it’s advisable to consult a professional motorcycle mechanic for assistance.